
A unique course where parents can guide kids on their journey of 3D Printing

Start Your Course Now!
The entire course is divided into 4 sections that give a brief introduction about the design process, 3D printing essentials, and model making. Each session will take around 40 to 60 minutes and it is recommended to space out the sessions with a gap of at least two days before the next session. Kids are encouraged to work on their assigned tasks between the sessions. The following are the action item block for the parent/guardian. Henceforth the parent/guardian would be referred to as “Educator” the child would be referred to as “Student”. You can make sure that the student has a pen and paper for every session.
Following are the action blocks that will prompt the educator for taking the respective actions.
Action Blocks
Read Out
This block prompts the educator to read the content aloud to the student.
Call For Action
This block prompts the educator to ask the student a question or to perform a certain task.
Display Content
This block suggests showing the diagram/chart/video content to the student.
Give Hints
This block suggests providing hints for the task/question to the student.
Ready, Set, Go…
Session 1
- Overall Product Design Process
- Various Prototyping Methods
- 2D and 3D Explanation
- 3D Printing and its importance
- Types of Printers
- Demonstration of TinkedCAD
Read Out
The process of product design which is also known as new product development is a set of activities that a team of designers undertakes to create a product from scratch to finish. Traditionally, this process is used to develop physical objects like your everyday vacuum cleaner, mobile phone, camera, and other objects that you find in your home. However, nowadays these techniques are increasingly used to develop software applications or your favorite computer games.
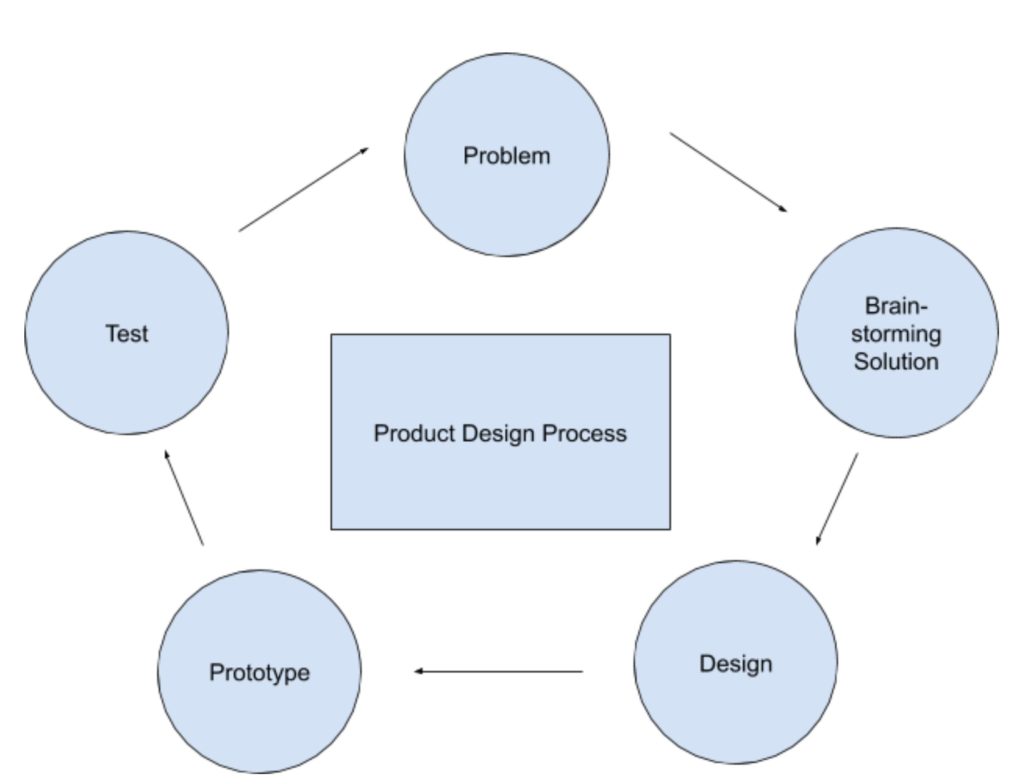
Various simple and complex methods exist in product design. The following diagram illustrates the steps of the product design that we are going to follow throughout this course.
Display Content
Call For Action
Can you tell me what is a problem?
Give Hints
Give the student some time (20 – 30 seconds) to think and respond. Ask them what types of problems they face during the day.
Read Out
A problem is any obstacle that prevents you from achieving what you want. For example, the toy car does not move on its own or your doll cannot get up on her own, after her nap. This can be one kind of problem. Some other problems might be that your desk is very small which does not allow you to study comfortably. Or the light in your room is very dull and you cannot read from your book. These are some examples of problems.
Call For Action
Can you write 5 examples of simple problems that you can notice in the house?
Call For Action
Have you heard the word Brainstorming before?
Read Out
Wait for the child to think. Explain that, Brainstorming is teamwork to find several solutions or ideas to solve the problem. Through Brainstorming, you can generate as many ideas as possible and it is done to boost creativity.
Now we will do a small brainstorming exercise (approximate time: 15 minutes). Consider a simple problem: Your wired earphones get tangled while using/storing.
Your task is to find different solutions so that the wires will not get tangled together. You can think of as many solutions as possible, minimum 5.
Call For Action
Hand over the notepad and ask the student to draw the diagram of the solution. The educator may help since it is a brainstorming session. You can take ideas from the internet, magazines, or any other sources.
Give Hints
Wait for some time and allow the student to think deeply. You can encourage them by giving some example solutions like keeping the wires in a box, tying up the wires around any object, using a flexible pouch to store them, etc.
Call For Action
Now you can select any one problem that you wrote in the earlier exercise and start brainstorming several methods to solve the problem. Once the method is identified please draw a rough diagram. You can brainstorm 3 or more different ideas to solve one problem.
Design
Read Out
The next process is designing the actual product. Design is the plan for making a product. We will learn in detail about this process in the subsequent chapters. The one who designs a product is called a designer. This involves drawing or making sketches of the product to better understand how it looks and to show your teammates.
Call For Action
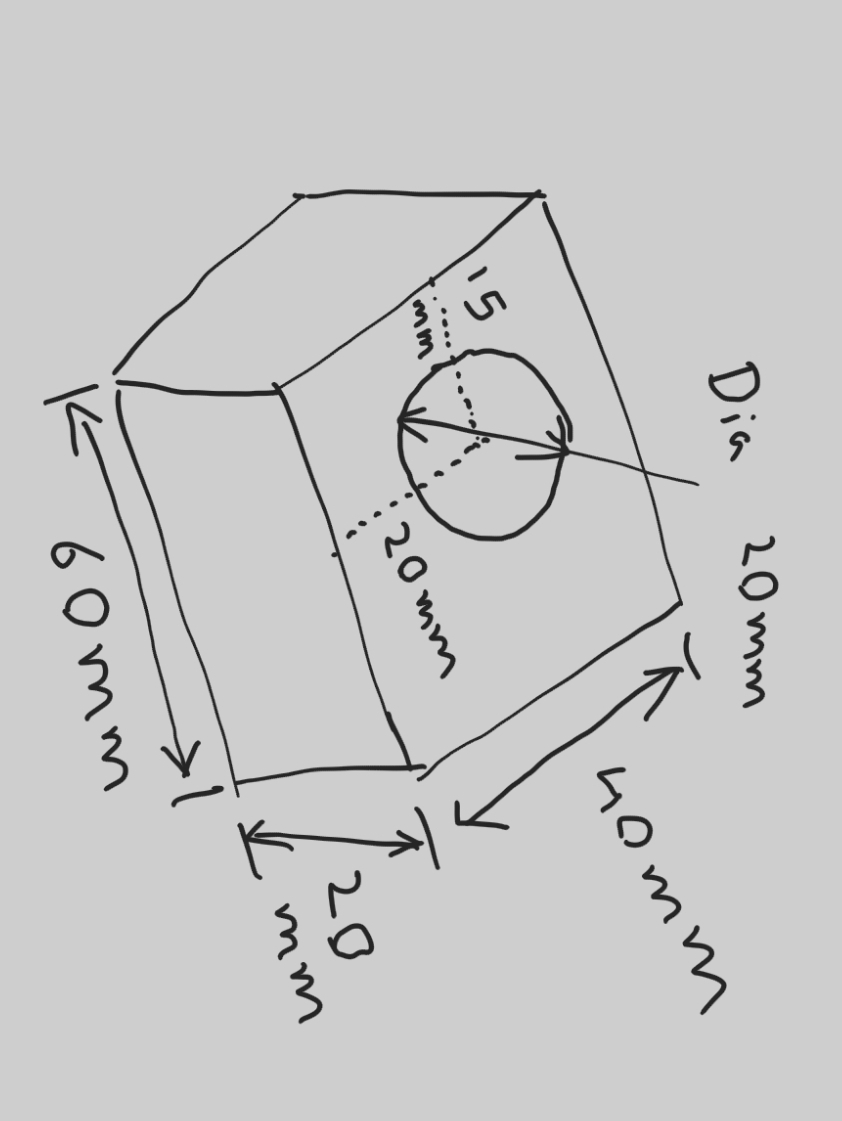
You can select any one of the brainstormed designs that you think is easy to make and that solves the problem, and make a detailed drawing. You can add as many details as you want. The details can be the length, breadth, height, diameter of the circle, material that will be used, etc.
Display Content
Please show the below image to the student.
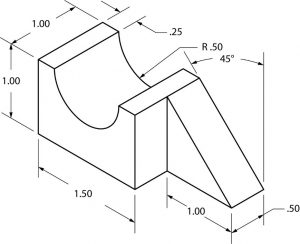
More about dimensioning can be found in this article by Open Oregon: https://openoregon.pressbooks.pub/blueprint/chapter/unit-5-dimensioning/
Prototyping
Call For Action
Have you heard the word ‘Prototyping’ ever before?
Read Out
A prototype is an early version of the final product that is made to test whether the idea works as made in the sketch. The process of making the prototype is called prototyping.
For example in the earlier example of the problem of wires getting tangled up, if you have drawn a pouch that can hold these wires, prototyping means creating an actual model of the drawing and testing whether it actually works.
More about this can be found in later sections.
Testing
Read Out
This is the process of finding whether the prototype that we build is able to complete the task for which it was built. For example, if we made a prototype of a water filter, we need to conduct a test and find out whether it is removing the impurities from the water and whether the system is watertight and there is no leakage in the system. These tests can be carried with the help of scientific instruments and the results can be recorded in the journal.
If the prototype passes through all the tests then the design can be finalized and approved for further processes. If the test fails, then the design is updated accordingly and the process is repeated until the prototype passes on the test criteria.
Various Prototyping Methods
Call For Action
Consider that you want to make a prototype of a house, and it can be of any size. Can you list 5 materials through which you can build your prototype? You can draw them in your book/paper.
Give Hints
Wait for the student to think and answer. After some time (5 minutes), provide them some examples and encourage them to think more about their toys and what can be used. Give the student a hint that the following materials can be used: play dough, clay, drinking straws, paper, playing cards, lego, etc.
Read Out
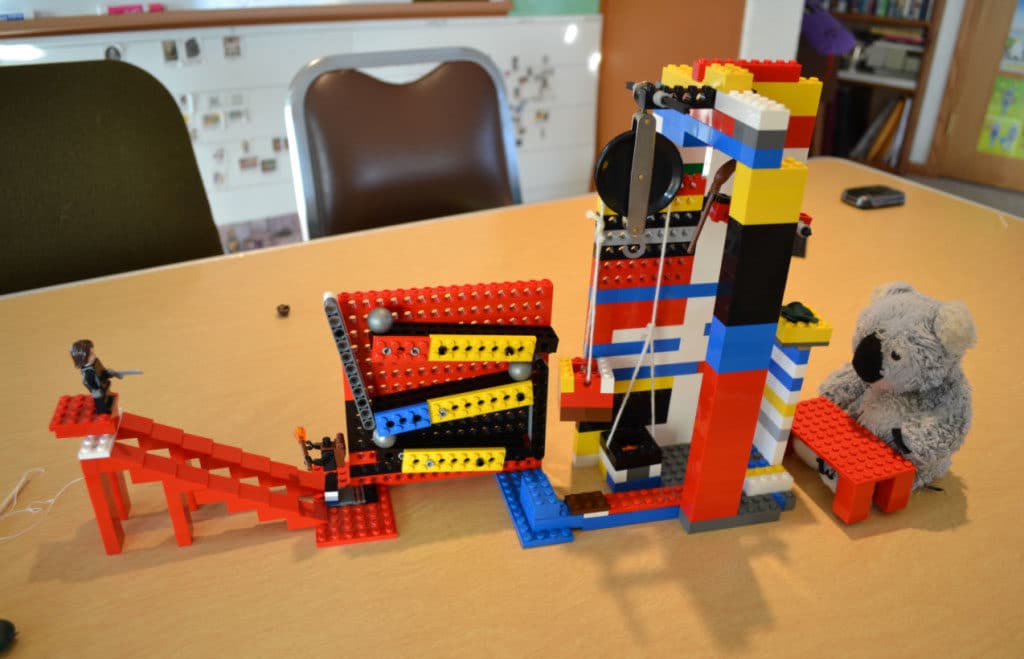
Most common examples of making prototypes include making use of everyday materials or even scrap parts. Some of the most common materials and methods that are used for prototyping are lego bricks, paper, cardboard, foam boards, thermocol, different types of wood, resin casting, sheet metal, and last but not least 3D Printing.
Display Content
You can show the images below to the student to understand how prototypes can be made.


2D & 3D Explanation
Read Out
Let us start with what is meant by dimensions. A dimension can be referred to as the freedom that the design has to expand. You can also consider this as the number of directions in which the object can grow. What do we mean by this is that a one-dimensional design can only grow in one dimension or we can also say only in one direction. A simple line is an example of a one-dimensional design. A line can only get bigger or smaller and there is no other way a line can grow.
Call For Action
Can you think of an example of a two-dimensional design?
Read Out
Anything that we can draw on one plane can be referred to as a two-dimensional design. Or anything that you can draw on a flat paper is two-dimensional. Here the design can extend in two different ways like horizontal and vertical direction. For example, a rectangle is a 2D shape. It can grow or expand vertically thus increasing the breadth or horizontally thus increasing the length. Also, keep in mind that these directions should be perpendicular to each other, like length and breadth.
Now let us consider, what is meant by a 3D design. Anything that can grow in 3 different directions like length, breadth, and height can be referred to as three-dimensional design. So cuboid is an example of a 3D object. A cuboid can expand either in length, breadth, or height. You can consider any drawing that can grow in height as a 3D design.
3D Printing and its importance
Call For Action
Can you tell me everything that you know about 3D printing.
Read Out
3D printing is the process of creating a 3-dimensional physical solid object from a digital design. In this process, the 3D printer reads the digital file and deposits the material over a base plate, single layer at a time. This process is repeated several times to completely build the digital design into a 3D physical model that you can touch and play with.
Display Content
Watch this video explaining how a 3D printer works
Call For Action
Do you think 3D printing is better than other prototyping processes discussed earlier? If yes/no, why?
Read Out
In today’s digital world it is very important that the machines can be quickly and easily integrated with computers to make the desired product maintain high quality. 3D Printing process allows the user to prepare any product with exact specifications as the designer has intended in the design.
Display Content
You can watch the following video in the link to understand more about 3D printing.
Types of 3D Printers
Read Out
We are now going to learn about different types of 3D printers. The different types of printers are mainly classified in the way the raw material is treated to form the final product. Based on this 3D Printers are classified into 9 different types. These types include Fused Deposition Modeling (FDM), Stereolithography (SLA), Digital Light Processing (DLP), Selective Laser Sintering (SLS), Selective Laser Melting (SLM), Electron Beam Melting (EBM), Laminated Object Manufacturing (LOM), Binder Jetting (BJ), and Material Jetting (MJ)
The most common types which we are going to discuss are FDM, SLA, and DLP. Fused Deposition Modelling is one of the most popular forms of technologies that are used in 3D printers. In this technology, the plastic filament is heated and laid down in fine layers on the base plate through the extruder head. This process is repeated several times to arrive at a final product. This technique requires post-processing operations to remove the sharp edges and finish the product. This is widely used in the prototyping field, however, it requires a considerable amount of time to build the product.
Stereolithography is yet another 3D printing technique, which is more advanced than the FDM technology. In this process, a liquid resin bath is used in which the product is built. This resin is a photo-polymer which gets hardened upon exposure to ultraviolet light. Before each printer, the liquid is again laid over in layer by a blade and the next cycle of photocuring begins. This process is repeated to make the final product. This process makes the product much faster than the one discussed earlier. The quality of
Selective Laser Sintering is in some ways similar to stereolithography. Instead of using liquid resin, this process uses metal, nylon, or even ceramic powders as the base raw material. There are two compartments in the selective laser sintering process, one compartment holds the powder, and the other compartment is used for making the product. The roller takes the uppermost layer of the powder from the powder compartment and spreads a single layer of the powder on the surface or the base plate of the product build compartment. A CO2 laser is used to specifically heat extremely small sections of the powder with high precision thus forming one layer of the product. When the powder is heated, it gets sintered and gets permanently bonded. The roller repeats the process and the cycle is repeated several times to achieve at the final product. The parts produced are of high quality and require minimum post-processing.
For more information on types of printers, please refer to https://3dinsider.com/3d-printer-types/
Display Content
You can watch the following video for understanding types of 3D printers.
Demonstration of TinkerCAD
Read Out
This is the most fun part of the course where you would learn how to design anything that you want using the software. TinkerCAD is free online software that you can use for 3D design, electronics, and even coding. This software would be used throughout the course for designing our models and later printing them using a 3D printer. Please watch the following videos to understand how to use the software.
Display Content
In this video, you will learn to make a hollow box with a snowflake design.

Call For Action
After carefully watching the video you have to recreate the model shown. You can completely watch the video first without starting on your own and then watch the video again and repeat the process shown. You can be asked to create an account first before you start with your design.
Display Content
In this video, you will learn different functions in TinkerCAD and try to build a spanner. You can directly start building the model or watch the video first and then build.

Session 2
- Explanation of Design, Build, Slice, Print, Test, and Paint
- Determine the problem to be solved / any product to be designed
- Sketch in 2D, envision the product
- Start to explore TinkerCAD options and tools
- Start designing using TinkerCAD
- Explanation of STL, Slicing tools (.gcode file), Fill %
Explanation of Design, Build, Slice, Print, Test, and Paint
Read Out
In 3D printing, the design process consists of sketching the model that you want to build and providing dimensions. Dimensions can be given in millimeters (mm) or inches (in.). TinkerCAD uses both mm and in. so you can choose whichever suits you best.
Display Content
The dimensions can be given in a way shown in the image below. Please show the image to the student.
Read Out
In this process, you will draw the model that you want to build and then provide the length, breadth, height, diameter, etc. of the features that you have drawn.
The build phase represents the designing of the model in 3 D using computer-aided design. Various software that is used to build the models is Computer-Aided Design or simply CAD software. Most popular among these are AutoCAD, SolidWorks, TinkerCAD, Blender, Sketchup, and many more. The basic functions provided by each of this software are the same however the method of using them may differ. Once you have built the design in this software, say TinkerCAD, then you have to save the file for the next operation. Here you need to save the file in the .STL format. This stands for Stereolithography or Standard Triangle Language, this is a very useful step before sending it to the printer. STL format stores the design in the form of a small triangular mesh structure like the image shown below.
Display Content
You can show the image below.

Source: 3DQuickPrinting
Read Out
The program will automatically save any model by converting it into a mesh of triangles.
The next phase is called slicing. As the name sounds, this process cuts or slices the 3D CAD model into fine layers. If you recall the process of 3D printing in which the printer applies each layer of material several times to completely build the model. This process allows the printer to understand the steps it needs to take to lay down each layer. The slicing process can be done using dedicated software like Cura, 3DPrinterOS, Ideamaker, KISSlicer, OctoPrint, etc. For this course, we will be using Cura software which is free software. This process converts the model in .gcode format, G-code can be called as the language which the printer can understand and start the printing right away. This language is used by 3D printers and CNC machines.
The next phase consists of printing the model that is sent to the printer in a sliced format. You do not need to do anything once the printer is set and the file is sent. You can conduct some tests to find out whether the product that is completed satisfies the requirements. For example, if you have designed an earphone holder then you can test whether the prototype satisfies these criteria. If you wish to add some contrast to your design, you can paint the model with oil paints and a brush. If you want to achieve a smooth finish then you can use fine-grit sandpaper and rub it against the part you want to paint, then apply a thin layer of white primer color and then apply the desired paint. Remember that once you use the sandpaper on the surface then the smoothness of the surface will increase however it will lose its original shine.
Determine the problem to be solved / any product to be designed
Call For Action
Now you are going to finalize the problem that you would like to solve.
Give Hints
Wait for the child to think and come up with an idea.
Some suggestions to get started: simple toy, small pot for your plants, or anything that you wanted and cannot get, but keep it simple for your first try. Here are some awesome ideas:
Display Content
You can show the below images for more inspiration. The student can consider any one of the following product to prototype.
Lens Cap Holder

Link: https://www.myminifactory.com/prints/3d-print-lens-cap-holder-3909
Card wallet

Link: https://www.thingiverse.com/thing:4072298
Cotton Swab and Stick Stand

Link:https://www.thingiverse.com/thing:4224358
SD Card Holder

Link: https://www.thingiverse.com/thing:4221435/files
Photo stand

Link: https://www.thingiverse.com/thing:106568
Antigravity Planter

Link: https://cults3d.com/en/3d-model/home/anti-gravity-planter
Impossible Table

Link: https://www.thingiverse.com/thing:3970291
Cable Organizer

Link: https://www.thingiverse.com/thing:3396905
Visit this link for more ideas: https://all3dp.com/1/useful-cool-things-3d-print-ideas-3d-printer-projects-stuff/
Sketch in 2D, envision the product
Call For Action
Now that you have decided what you want, we are going to take small steps to create the product.
- Take a sketchbook or plain white paper and start sketching the diagram of the product. Now start naming the parts and the materials that you would be using in the sketch.
- Now take another paper and start sketching the individual parts of your design. Give the appropriate dimensions for the individual component.
- Conduct a mind testing of the products that you have designed. Just close your eyes and imagine how the product will work once it is 3d printed if you feel some parts are missing, go back and sketch the remaining parts.
- Now you are all set for printing the product.
Start to explore TinkerCAD options and tools

Call For Action
Visit the TinkerCAD website and make an account if haven’t made it already.
Link: https://www.tinkercad.com/learn/project-gallery;collectionId=OY5L5E8IRXTI47Z
You can start with simple projects on the TinkerCAD using the above link.
Display Content
If you are unsure about using this software, checkout some of the videos below.
Start designing using TinkerCAD
You are now in a position to start designing the product with the software. Take the sketch that you have drawn and start with the design.
Explanation of STL, Slicing tools (.gcode file), Fill %
Read Out
STL stands for standard tesselation language or standard triangle language. It is the end product of the completed 3D CAD model. This is file formate like .pdx and .docx is for storing documents or.png and .jpeg is the file format for storing images, similarly, a 3D printer suitable format is .stl, and most of the software allows for this file conversion while exporting or saving the file.
For more information, please visit the link: https://all3dp.com/what-is-stl-file-format-extension-3d-printing/
Slicing Tools
As discussed previously, the .STL file needs to pass through the slicing software to convert in into the .gcode file format. This file formate can be directly given to the 3D printer and it provides the instructions for its each and every movement. As the name refers, the slicing tools convert the entire mode into thin slices that can be directly printed.
Following is the list of all the slicing tools that are available.

Source: Support.Ultimaker
More information about the .gcode can be found here: https://support.ultimaker.com/hc/en-us/articles/360012733080-What-is-g-code-
Read Out
Fill %
If you have seen any big 3D printed objects you may notice that they are very light and you can squeeze them if you press hard. This is because the entire object is not completely filled with the raw material, it is actually quite hollow.
The % fill is the value that you can set at the time of converting the file in .gcode format in the software. If you increase the fill% then more material will be used to make the object making it heavy and strong, however, it will take a long time to print and more material to build the product. This is also referred to as infill.
You can know more about the fill percentage here: https://all3dp.com/2/infill-3d-printing-what-it-means-and-how-to-use-it/
Display Content
Please watch the video for knowing more about infill types.
Session 3
Call For Action
Continue design with TinkerCAD
In this session, you should plan to complete the CAD design. You can watch more tutorials on Youtube or another platform for understanding more about TinkerCAD. If you are not able to design due to the complexity of the part then go back to the sketch and try to modify the design to a simpler geometry.
Reach out to Silicon Box if you encounter any issues
Feel free to reach out to Silicon Bx if you are having any issues with the design and we would provide you with the necessary support.
Complete the design in this session
Try to complete the design in this session as we are going to start the printer in the next session which would need a complete CAD model.
At this point, you should not take more than 2 hours to complete your design.
Session 4
- Download STL and convert to .gcode using Cura
- Printer setup (leveling, blue tape)
- Start the printer with the required design loaded
- Take out the finished part after the printing is complete
- Perform finishing operation by removing sharp edges, remove the overhang support, paint the product for enhanced looks
- Certificate of completion from Silicon Box
Download STL and convert to .gcode using Cura
Read Out
While you are saving the file you can convert it into a .STL file and save it to your computer. Then use the Cura software to slice the model and convert it into the .gcode file.
You can find Cura with this link: https://ultimaker.com/software/ultimaker-cura
You can watch here how to use the software: https://www.youtube.com/watch?v=eUNTlb5pEWA
You can attach your printer to your computer and link it through cura software for printing, else you can download the .gcode file that Cura will make into a removable storage device and then attach it to the 3D printer.
Printer setup (leveling, blue tape)
To obtain quality prints leveling the print bed is important.
CTC i3 3D Printer
For the CTC i3 3D Printer follow these instructions. Have a sheet of paper handle as well as a set of needle nose pliers. Make sure the nozzle isn’t hot before moving the hot end.
- Click the center button on the LCD screen to enter the menu. Sometimes the buttons don’t quite work so you’ll have to push the to the left or right if they don’t quite work.
- Navigate to prepare and select Auto Home
- The printer will move the nozzle off the print bed so you can look to see if the nozzle will impact the bed if it was under the bed.
- Now go back to the menu and under prepare select Disable Steppers
- Adjust the Z-axis screw to have the nozzle stop as close as possible above the print bed. You want to be able to place a sheet of paper between the bed and the nozzle and feel a very slight resistance, but not enough that you can’t push and pull the paper. If the nozzle is too far from the bed, move the screw up. If the nozzle is too close from the bed move the screw down. Once you are done click auto home again. Repeat this step until the nozzle is close enough. In the next step you can use the bed screws at the four corners to fine tune the leveling.
- Again disable steppers, now you can move the nozzle left and right and the bed forward and back. Using those movements move the nozzle to the four corners and adjust the screws under the bed to move the bed closer or father from the nozzle to make the paper slide back and forth with very minimal resistance.
Printrbot 3D Printer
No leveling required
Blue Tape
Also, making sure the print bed is clear of any dust or oil will make it so your print sticks to the bed while printing. Using blue painters tape is recommended. Just place the strips down the normal way with adhesive sticking to the bed. Try not to overlap the tape as it will cause slight height differences in the print height.
Printing and Finishing
Start the printer with the required design loaded. Keep checking the printer once in 20-30 minutes for any issues. Some of the common issues involve nozzle failinging to load material, wrapping of material, oozing extra material, web strands across the model, etc.
For finding about the common problems and their solutions please visit this blog by Printopeer.

Source: Printtopeer.com
Article link: https://www.printtopeer.com/common-3d-printing-problems/
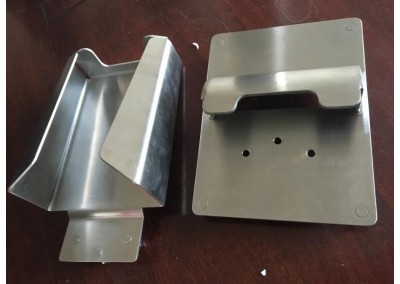
Take out the finished part after the printing is complete. For this process be aware that the base plate of the printer might be hot. You can make use of a tool with a flat base which is similar to the one shown in the figure.

Source: toolgyd.com
Perform finishing operation by removing sharp edges, remove the overhang support, paint the product for enhanced looks. You can make use of a sand paper (200 – 600 grits). For the ultimate guide on 3D print finishing, please refer to this awesome article.

Source: finctiv.com